Installation and Configuration
Populate Items for Sale
Create Sale Order
Print Receipt
Generate Daily/Monthly Reports
Cashier - Turn your PC into a smart cashier
You run a small business like coffee shop, or bistro, and you want to use computer to manage your sales, but you can afford to buy expensive CRM or ERp system, then this Smart Cashier is your choice, Smart Cashier is a very small software requires little effort to get it up and running.1. Installation and Configuration
First, download it from EPPMSoft Inc at http://eppmsoft.com/downloads.php, it's free!
Next, opening File Browser, browse to "Downloads" folder, and right click the downloaded file called Cashier.zip, and select "Extract All", and follow the screen to extract the file to your local PC.
Now, browse to the folder the files are just extracted to, find the file named "Cashier.exe.config", and right click it and select "Open with" and choose "NotePad". After the file is open, find the followin section.
  <applicationSettings>
        <Cashier.Properties.Settings>
            <setting name="connStr" serializeAs="String">
              <value>Provider=System.Data.SqlLite; Data Source=cashier.db; Version=3;</value>
            </setting>
            <setting name="CashdrawerPrinter" serializeAs="String">
                <value>Epson TM-90|27,112,0,25,250</value>
            </setting>
            <setting name="companyName" serializeAs="String">
                <value>Best Tastes Restaurant </value>
            </setting>
            <setting name="address" serializeAs="String">
                <value>1938 Prairie Ave</value>
            </setting>
            <setting name="address1" serializeAs="String">
                <value>Coquitlam, BC V3S1P4</value>
            </setting>
            <setting name="phone" serializeAs="String">
                <value>(604) 941-8811</value>
            </setting>
            <setting name="GSTNo" serializeAs="String">
                <valuegt;HST No 111-222-333</value>
            </setting>
            <setting name="website" serializeAs="String">
                <value />
            </setting>
        </Cashier.Properties.Settings>
    </applicationSettings>
Change the value for those fields: companyName, address, address1, phone, GSTNo, they will be be printed in the receipt.If you have a casher drawer attached to your receipt printer, and you want to control the cashier drawer from your PC, then, you need to change the "CashdrawerPrinter" field, the default value is "Epson TM-90|27,112,0,25,250", it works with EPSON TM series receipt printer. Let's say you have a different printer, then you need to find the correct value from the file called "cashdrawer_codes.dat" in the "App_Data" sub-folder. To get the correct value for your printer, right click the "cashdrawer_codes.dat" file, and select "Open with" and choose "NotePad". After the file is open, find the printer that matches your printer model, let's say your printer model is "Star TSP 100", and you will see the matched line is "Star TSP 100 7", then enter "Star TSP 100|7" in the "CashdrawerPrinter" field (note: there is a "|" separator that separates the first part - printer model from the last part - cash drawer control codes).
Finally, save the file, and it's done!
2. Populate Items for Sale
Let's say you have a list of items to be sold, you need to enter the list of items into the software as inventory.
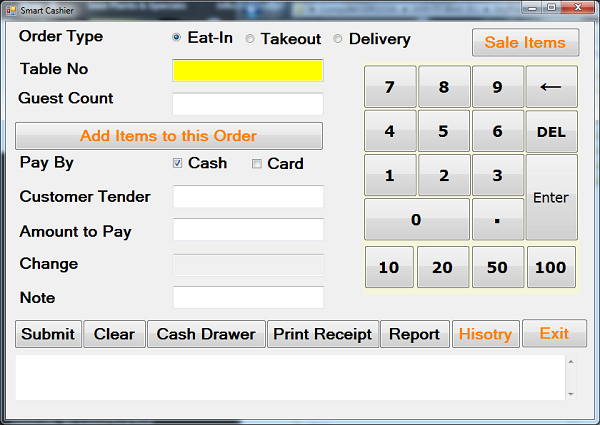
First, you need to launch the Smart Cashier app by double-click the "Cashier.exe" executable file. The screen appears like the figure below.
Click "Sale Items" in the top right corner, and the screen like the figure below should appear.
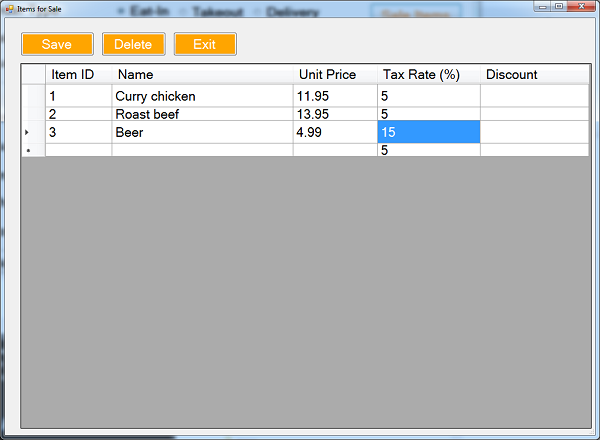
The "Item ID" column will be populated automatically, you don't need to do anything in this column.
Type in the Name, Unit Price, Tax Rate, and Discount fields, a new row is added automatically when you finish typing in the last column of the row.
You can hit "Save" button any time to save the items.
You can delete existing items by highlighting the row, and hit "Delete" button.
Hit "Exit" to finish the item population.
3. Create Sale Order.
From the Smart Cashier main screen, click "Add Items to this Order" button, and the screen appears for you to add the items you populate in the previous step.
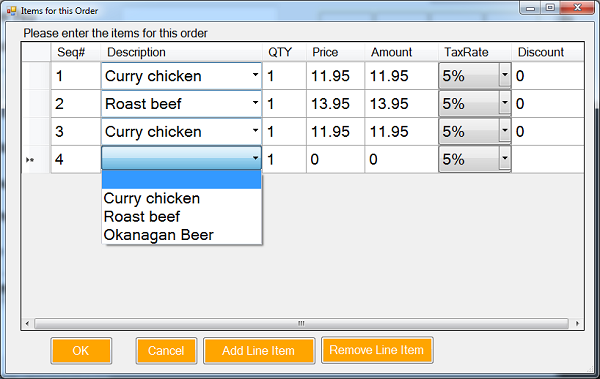
The "Seq#" column is read only as it is filled automatically. Select the item you want to add from the "Description" dropdown list.Then enter the quantity in the QTY field, and the "Price" and "Taxrate" fields are auto-filled after the description is selected,
you can manually change the price. The amount column is calculated by the quantity and price in this lineitem.
If discount is applicable, enter in its column.
A new row is automatically generated, and you can add a new row by hiting the "Add Line Item" button.
You can also remove a line item by highlighting the row, then hit "Remove Line Item" button.
After adding the line items, click "OK" button to come back to the main screen.
In the main screen, enter in the "Table No", "Guest Count", and other applicable fields
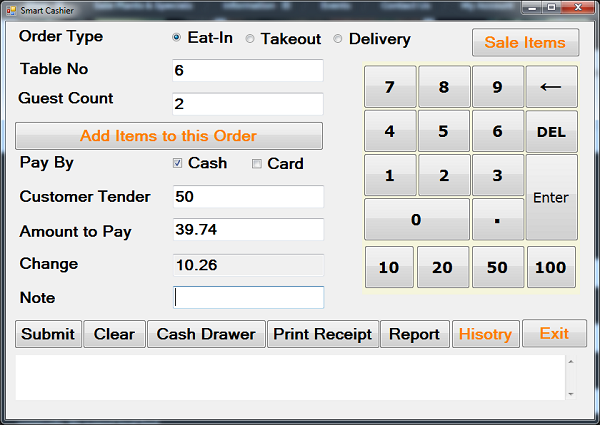
Click "Submit" button to save the order, then you can print receipt, open cash drawer, and get the report, etc.
After the order is submitted, if you want to add another new order, hit "clear" button, then repeat the actions in this step.
4. Print Receipt from Order History.
You can hit "Print Receipt" button from the main screen after you submit your order.
After submitting, if you want to print the receipt again, you can hit "History" button, and find the order, and highlight it, then hit "Print Receipt" button in the Histroy screen.
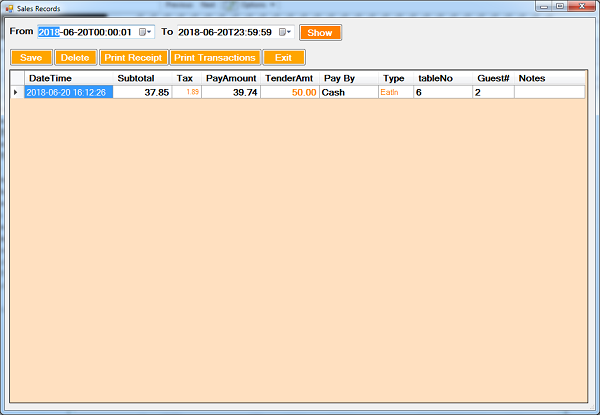
In the History screen, you modify the order, and save the changes. You can also delete orders, or print transactions.
If you change "From" and "To" dates, you can get the sale histories for a week, a month, or a quarter, a year.
4. Generate Daily/Monthly Reports.
With Smart Cashier, you can easily get the sale reports. The report can be daily, monthly, quarterly, or annually, depends on the date range you enter in the report screen.
You can go the Report screen by hitting "Report" button from the main screen.
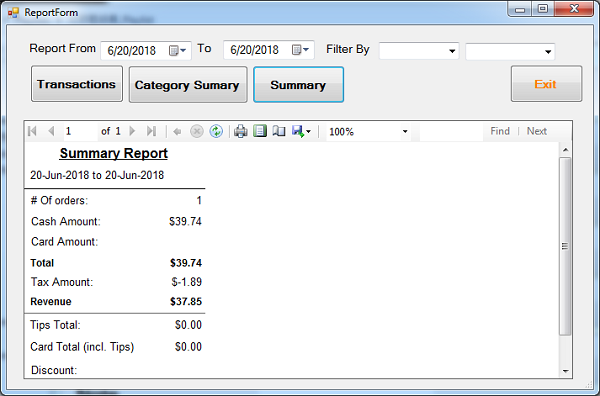
The "Report From" and "to" are filled automatically for current date, you can change accordingly to get one week, one month, or one year.
After the date range is entered, click "Summary" button, and you should get the report for report period.
Click "Transactions" button to get the sale transactions for the given period.
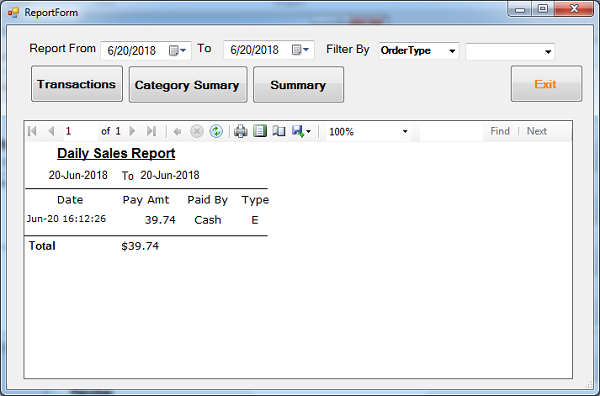
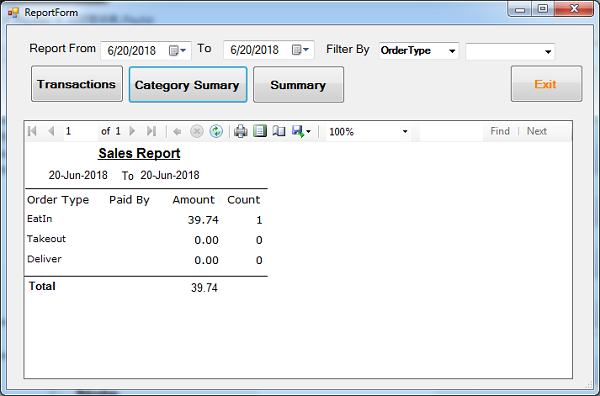
If you select something from the "Filter By" dropdown list, and select the value for the filter (optional), then hit "Category Summary", and you will get the report for the filter.
Some icons in the report pane are useful, for example, Print icon allows you to print to a printer installed in the PC, and Page Setup icon allows you to select the paper size and adjust the margins, and Export icon allows you to export the report to Excel, Word, or PDF file.