Launch RMPOS application
Create new users
Set up categories and tax rates
Add or edit menus
Build Menu Options
Set up printers and
other global settings
Place orders
Item Split
Delete an order
Print bills/receipts
Order Payment
Bill Separation
Order on-hold
Adjust orders
Advanced Order Management
Table Reservation
Sales Reports
Q & A
RMPOS User Guides
Launch RMPOS application
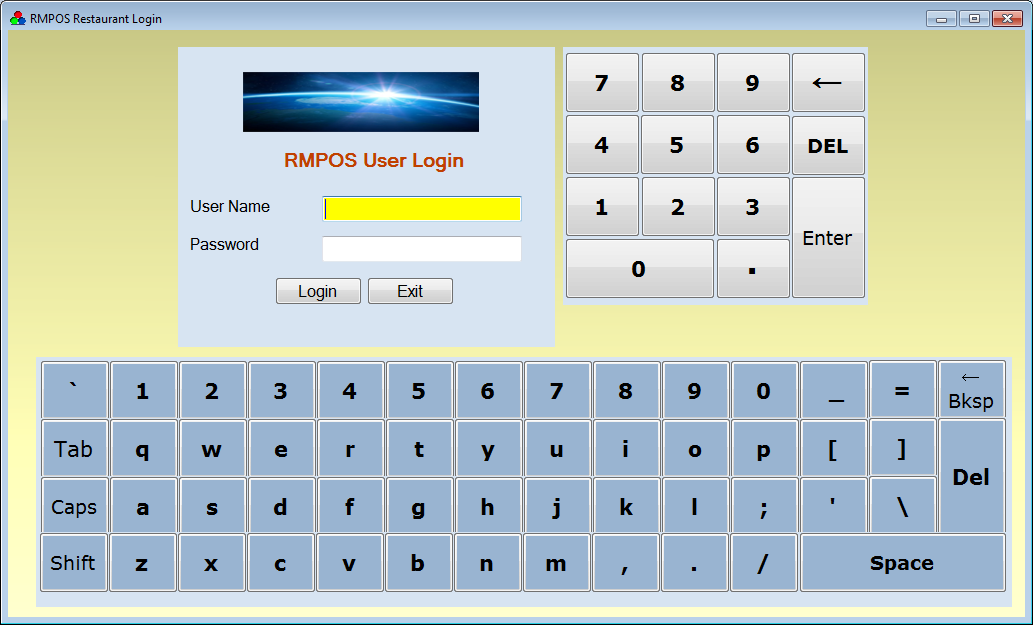
You can start RMPOS from the shortcut in the desktop, or click Windows Start, and All Programs, then RMPOS, finally hit RMPOS to run the application. Now you should see the login screen, the default user is rmpos, and password is Rmpos123$
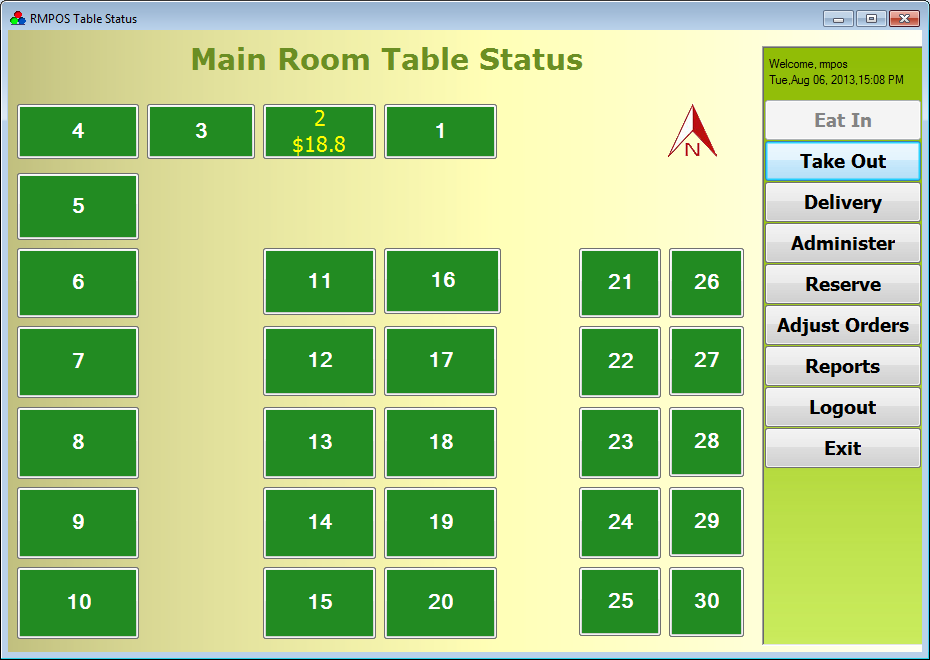
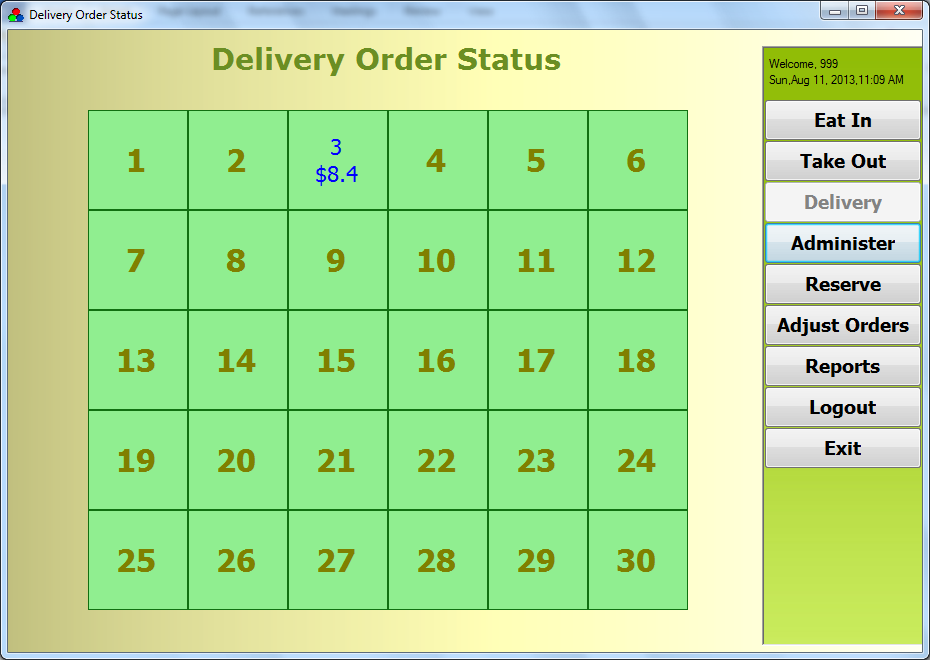
After login with rmpos user account, the main screen looks like the screen shot below, depends on the layout of your main dining room. The current active tables are being showed with the total amount in yellow color (see the table 2 in the screenshot below).
In the right side, it’s the function pane in which all the functions listed. The current screen shows restaurant’s main floor layout, that’s the Eat In function which is greyed out now. If you want to switch to the Take Out layout, simply click the Take Out button.
Create new users and maintain user accounts
This function is included in the Administration features. Let’s click Administer from the main screen to access this function.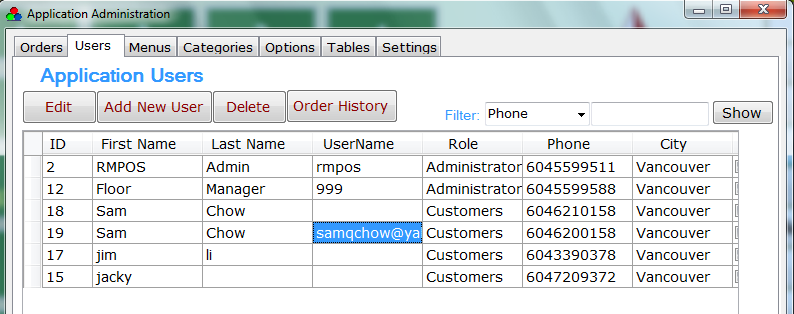
Let’s click the Users tab to switch to view User screen from Orders screen. Now we should see user accounts were created or updated in the last 30 days. Let’s create a new user by hitting the Add New User button.
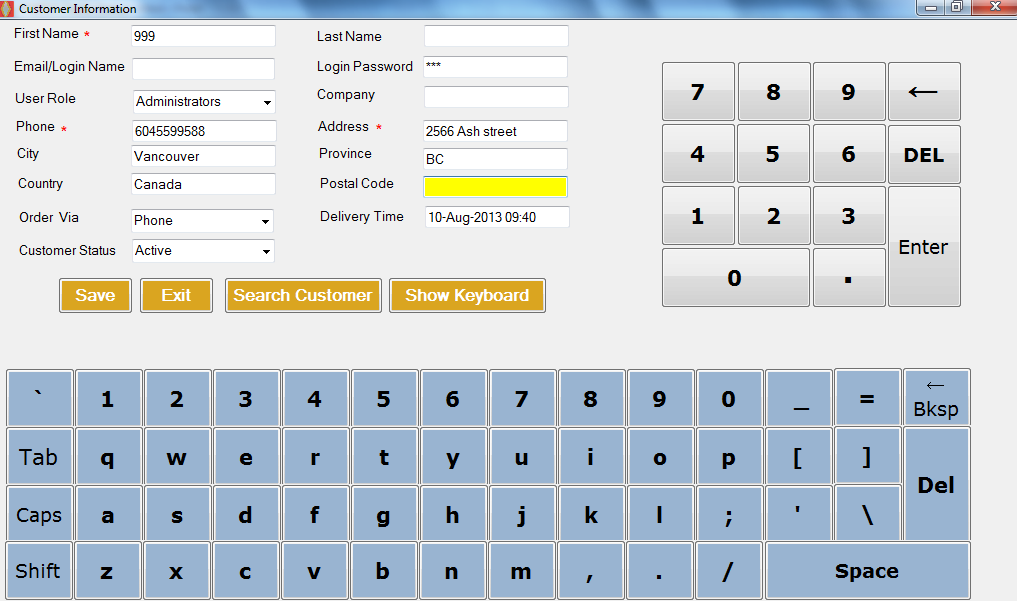
To create a new user, we must enter three fields: First Name, Phone, and Address.
Let’s enter the follow new user info:
First name: 999
Email/Login Name: 999
Password: 999
User Role: Administrators
Phone: 6045599588
Address: 2566 Ash Street
After finish the entries above, click Save button to store the info in the system. Be careful when select User Role, the Administrators role has highest privileges, and the Employees role has less permission and can be used for waiter/waitress. The Customers role is only used for customers.
There are soft keyboards in the screen; you can use them to input data. The soft keyboards are designed for touch screen operation.
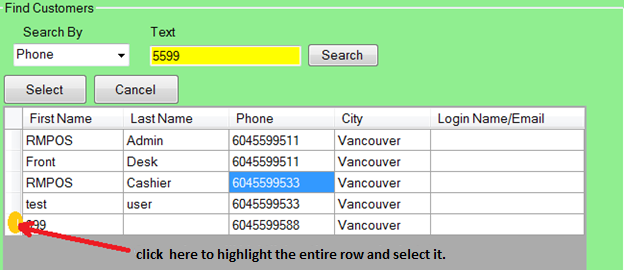
After we saved the user info, let’s search to see if the user already exists. Click Search Customer button and the scree below appears. By default, it’s searched by Phone, you can only enter part of phone number to search, for example, we enter 6045599588 as number above, now we don’t need to enter the whole number, instead, we only need to enter 5599 in the Text field to search. Click Search button, and we should see the user whose first name is 999 is listed in the result. To select the user, click the first blank cell near the First Name, and then click the Select button.
Let’s click Cancel button to return, then click Exit button back to the Users screen. Now, we should see the new user is the list.
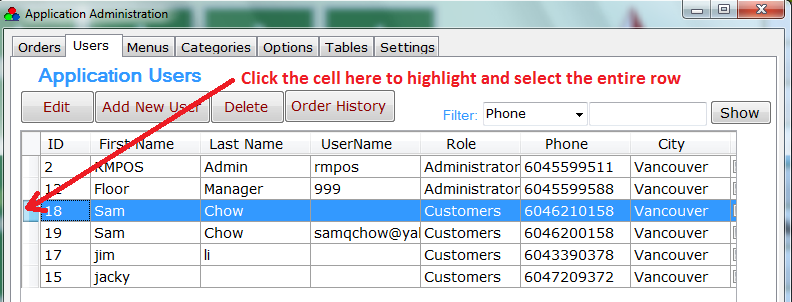
To edit the new added user, click the first blank cell near the First Name in the row, and you will see the entire row is highlighted. Now click the Edit button to bring out the user info for change.
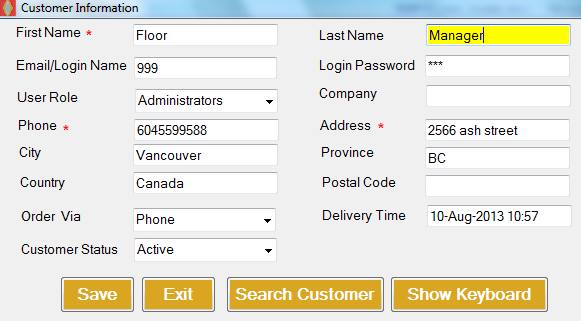
Let’s change First Name to Floor, and last Name to Manager (see screenshot below), and click Save button.
Click Exit button back to User screen, and we will see the user’s first name and last name are being changed.
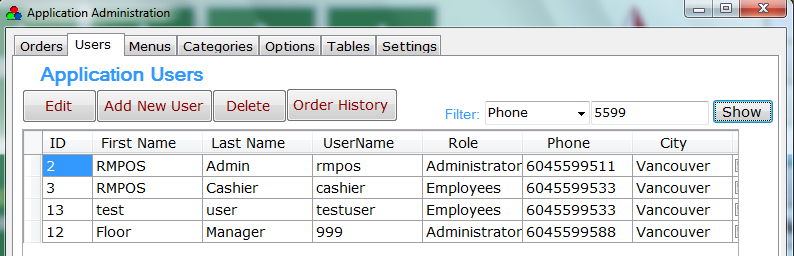
We can also use filter to find the users, for example, I want to find all users whose phone number contains 5599. Because the selected filter is phone by default, we just need to type 5599 in the value field, and hit Show button, all users meet the filter are listed below.
To view a customer’s order history, first, select the user, then hit Order History button.
Set up categories and tax rates
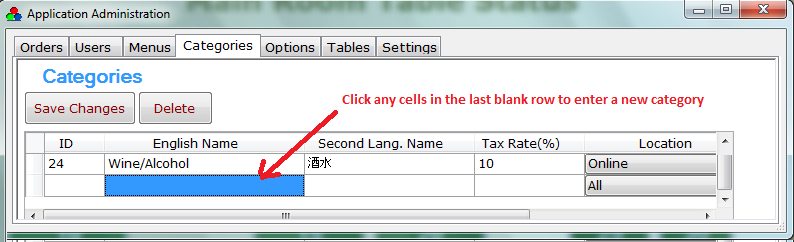
Like Adding User, we can set up categories and tax rates in the Application Administration. Click Categories tab from Administration screen, and the categories screen should appears
The categories include the following columns: ID, English Name, Second Language Name, Tax Rate, and Location. If your application requires of second language, enter it in the Second Language Column, and if tax is applicable, enter it in the Tax Rate (%) column, and if there are multiple restaurant locations, and the category is only available in a certain location, select the correct one from this dropdown box.
To add a new category, click the any cells in the last blank row
Let’s enter a new category below (The ID column will be filled automatically after you save):
English Name: Bakery
Second Language name: 面包类
Tax Rate (%): 5
Location:  All
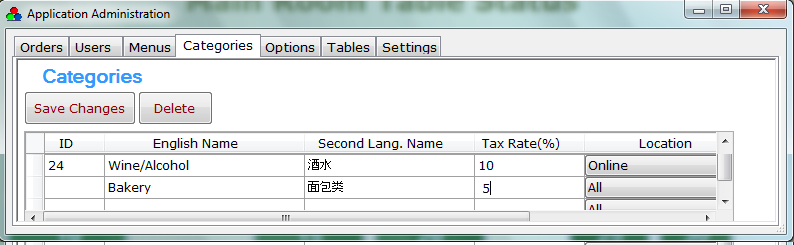
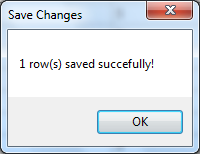
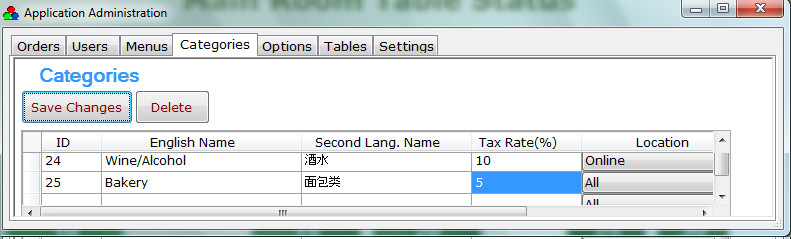
Click Save Changes button after all are entered, and a pop up appears to tell you the result, and if the save action is successful, a new ID will be showed in the ID column (see the screenshot below).
To delete a category, highlight the category row, and click Delete button. To select more than one category to delete, press CTRL key, and click the blank cells in the first blank column.
Add or edit menus
After categories are created, we can create menu items now. Like Categories, menus can be added, edited, or removed easily. Click Menu tab to bring up the menu screen.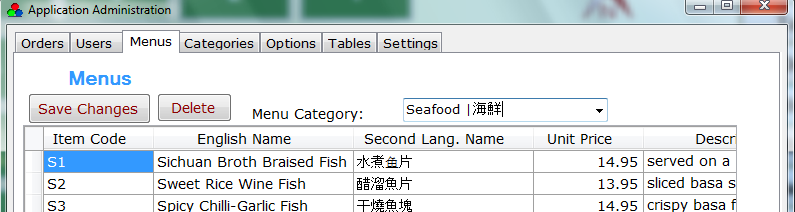
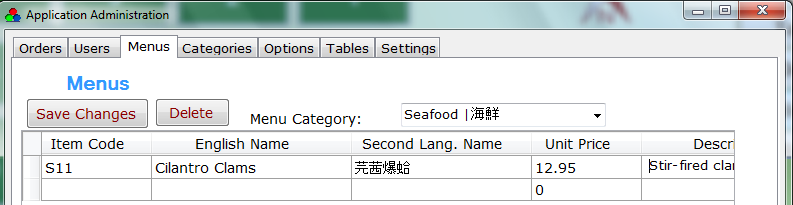
Let’s add a new menu call Cilantro Clams. First, we need to select the category called Seafood which the new menu belongs to, then click any blank cells in the last blank row, and enter the following info:
Item Code: S11
English Name: Cilantro Clams
Second Language Name: 芫茜爆蛤
Unit Price: 12.95
Description:  Stir-fired clams with fresh cilantro.
After enter the entries above, don’t forget to click Save Changes button to store and menu in the Computer.
To edit a menu, just hit the cell and change directly, and you have to hit Save Changes button to persist your changes. To delete a menu, highlight the menu row, then click Delete button.
Build Menu Options
Customers have a choice for the menu you order, and Menu Options are designed for this purpose. For example, a customer orders a menu called Cumin Beef, but the customer doesn’t like to have much salt or oil in the item, so the customer can ask for the Less Salt and Less Oil options.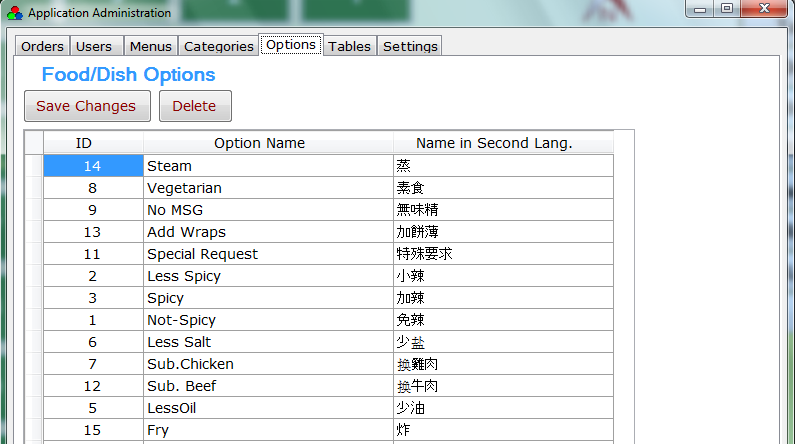
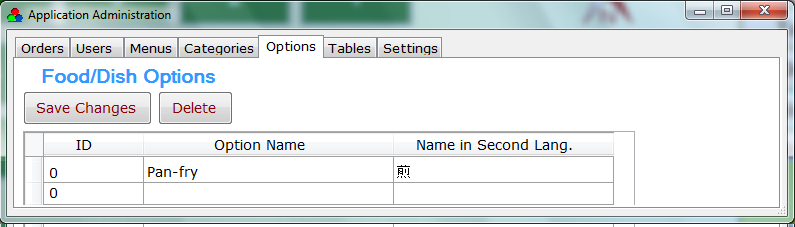
Let’s hit Options tab to build menu options. To add a new option, click the last blank row, then enter Option Name and Name in Second Language if applicable. You don’t need to enter the ID value, it will be generated automatically. After all required values are entered; hit the Save Changes button to store the option in the database permanently. Delete and Edit action are the same as Menu.
Set up printers and other global settings for the application
To see the application’s global settings, please hit the Settings tab. Here is the screenshot.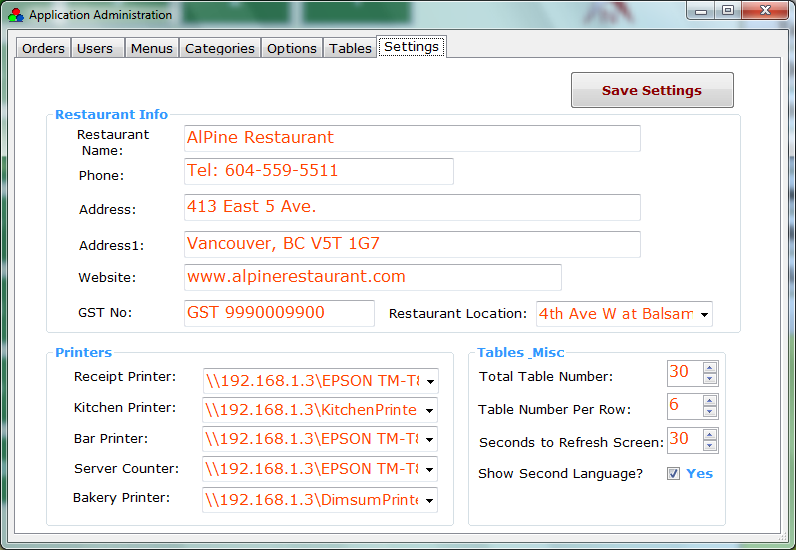
You can enter restaurant’s information, table settings, and printers.
There are up to five printers you can set: receipt printer, Kitchen Printer, Bar printer, server Printer, and Bakery Printer. If you only have one printer, and you like all printing job carried out by this printer, you can set all printers above to the same printer.
The Total Table Number and Table Number per Row are used to displayed tables in the main screen. In a network environment, if your restaurant has more than one computer, you may need to set Seconds to Refresh Screen, the default value is 30 seconds to update screen to reflect the current table status. For example, after a table is checkout by a computer, and you want another computer to know the change within 8 seconds, then you should set Seconds to Refresh Screen to 8.
The Show Second Language checkbox allow you to enable or disable second language display in the application. That’s good for a situation where bilingual is required.
After you change any settings, don’t forget to click Save Settings button.
Place orders
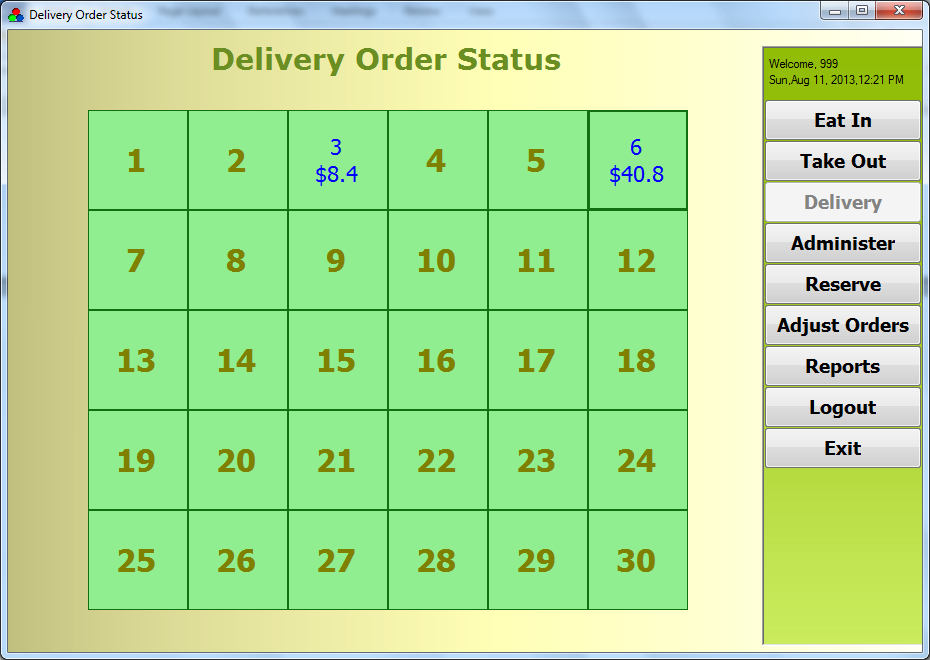
To set up a table for guests and enter a new order, let’s go back to the main screen called Table Status. This program allows you to create three types of order: Eat-In, Takeout, and Delivery. Delivery order requires of you to provide customer’s contact info such as First Name, Phone, and Address, while the other two (Eat-In, Takeout) don’t have such requirements.Let’s create a delivery order as an example. To create a delivery order, click Delivery button from the main screen, and the screen below appears.
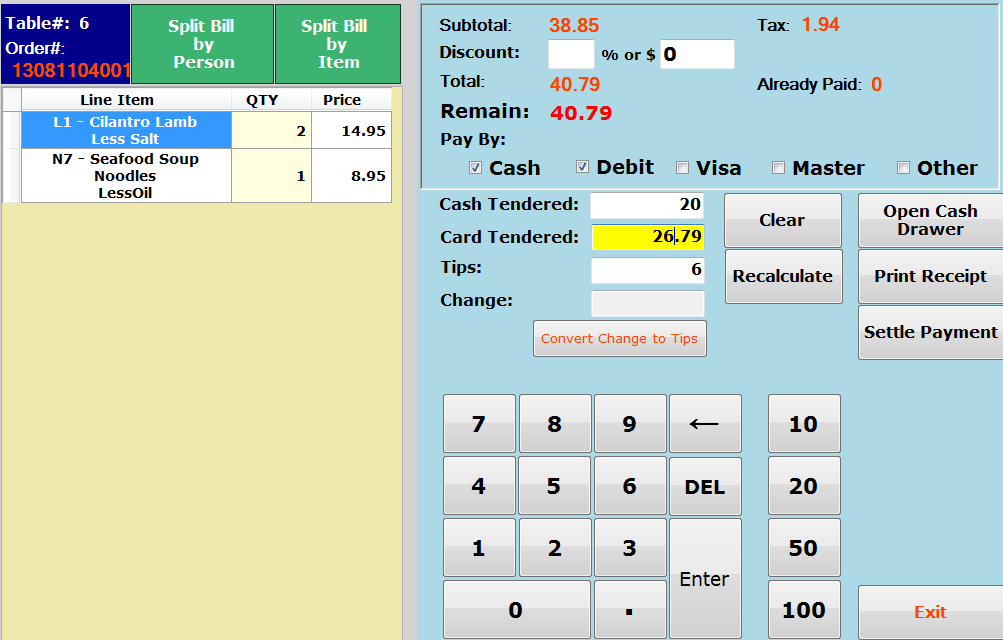
If we like to create an order at table #6, click the square contains “6”.
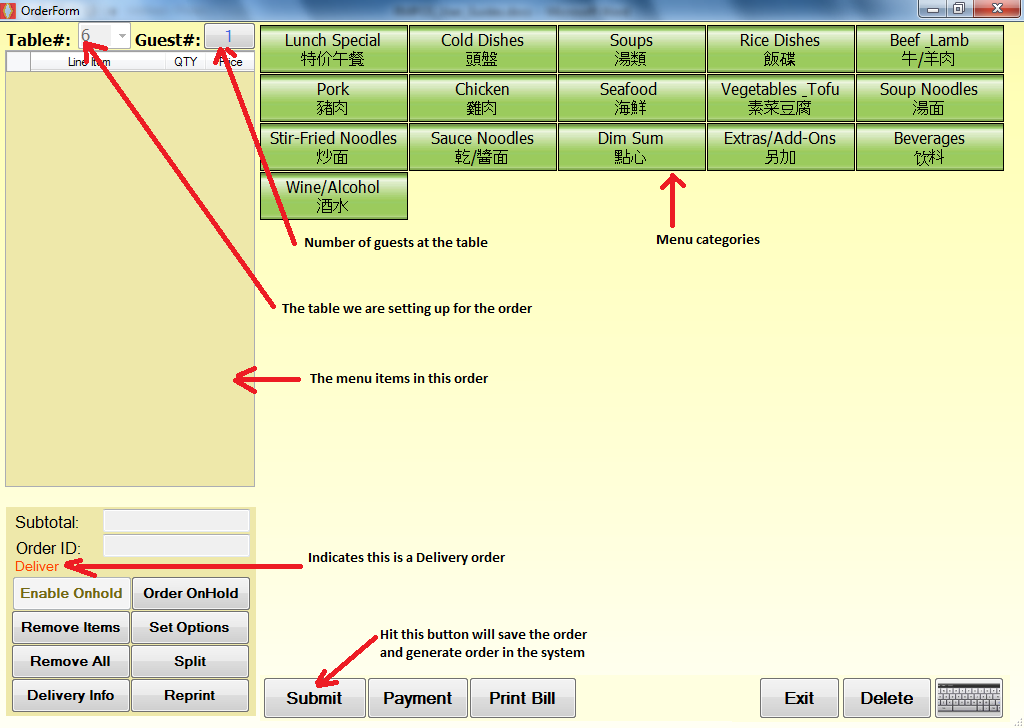
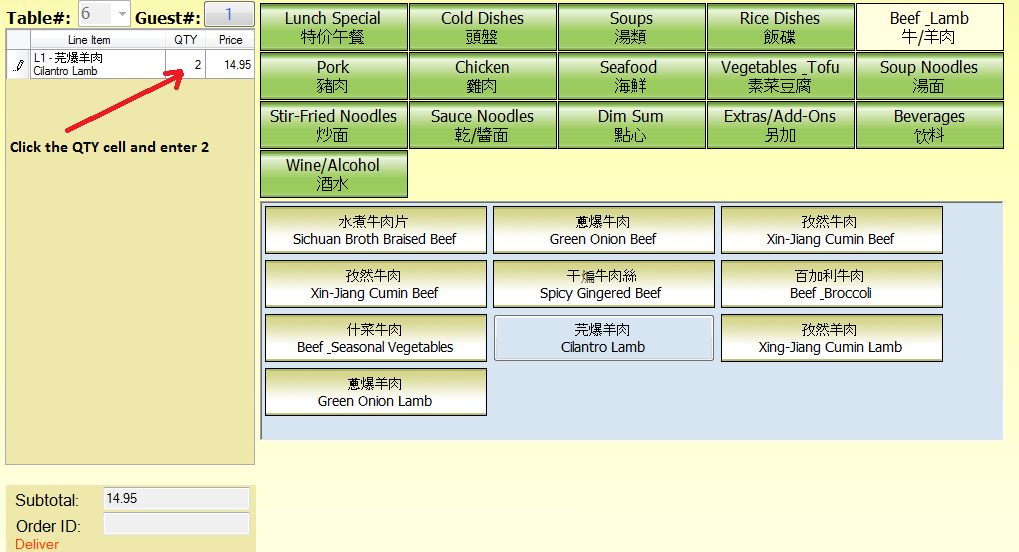
Now we should see the screen above. Let’s say the customer orders two menu items: Cilantro Lamb with the option of less salt, Seafood Soup Noodles with less oil option.
Click Beef Lamb category, then click Cilantro Lamb, and the item is added to the order list in the left side. Let’s say customer orders two of this item, then click the QTY cell of the item, and enter the number 2. You can add the Seafood Soup Noodles to the order list using the same way.
After we added the two items to the order, we need to set the options for the items because the customer requires less salt for the first item and less oil for the second item. Let’s select the first item by clicking the first blank cell in the row contains Cilantro Lamb item, then click Set Options button, and all options will be shown as checkboxes for you to choose. Check the Less Salt checkbox and click OK button to finish. Similarly, we can set Less Oil option to the second item.
If you want to change the table#, you can do so by click the Table# dropdown box, and select the available table to change. That happens when guests want to change to another preferred table.
You can also enter the guest# in the table by hitting the Guest# button. You can change the quantity and price by clicking the appropriate cells.
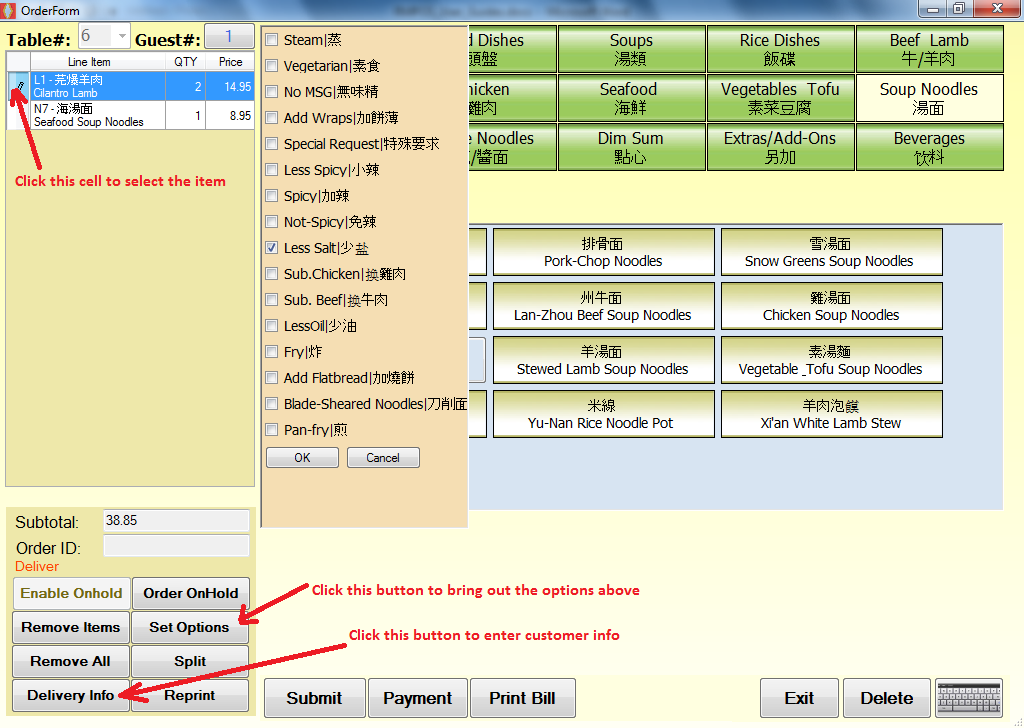
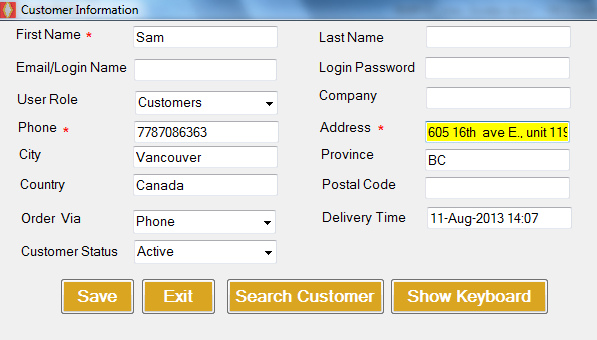
After items and options are added, we need to enter customer’s delivery info because this is a delivery order. To provide customer’s delivery info, click Delivery Info button. After the Customer Information screen appears, enter three required fields: First Name, Phone, and Address, then click Save button, and click Exit button to return.
Now we already entered all required data for the order, click Submit button to save the order. Two slips are printed during the submission. One slip is for kitchen, the other is for waiter/waitress. After submitting, the current screen is closed automatically and return to the main screen. We should see the table 6 is shown with the total amount in blue color, see the screenshot below.
If you want to add or edit items from the new order in the table 6, click the table 6 again. You will see the same screen as above. Once the order is submitted, you cannot remove the item, but you can change the quantity to zero to cancel this item. To cancel the entire order, there are two ways to achieve, one is set the quantity to zero for all items, and submit the order, and then the order is automatically cancelled. The order way is to use the Adjust Orders from the main screen and set the order status to cancel. Either way, we need to notify kitchen of the cancellation.
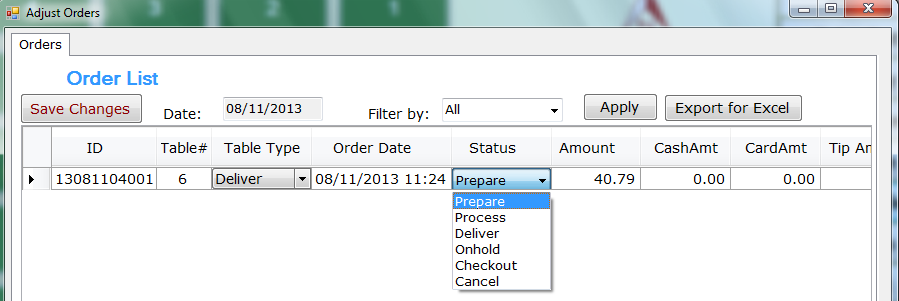
Let’s go to use Adjust Orders to cancel an order. Hit Adjust Orders from main screen, and the screen listed with today’s orders appears, find the order you want to cancel, click Status combo textbox, and select Cancel from the list. Finally click Save Changes to save it.
Item Split
In the case of an item need to split in half, select the item when the table with order is open, and then click Split button. Now, enter the number of guests to split the item and Hit OK.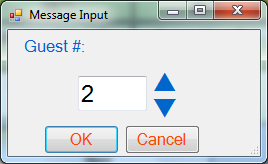
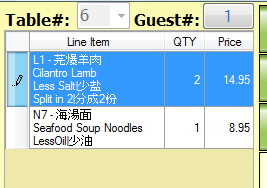
After split item, the final result sees the right figure above. To remove the split, enter the guest# to 1.
Delete an order
There is two ways to delete an order, one is to delete from the OrderForm screen, antoher way is to delete from Administration. Both ways require the login user has the Administration role.
Print bills/receipts
If you want to print a bill or invoice, just open the table with the order, and click Print Bill button.Order Payment
To settle payment for an order, open the table with the correct order, and in the OrderForm screen, clicks Payment. Let’s say the order has $40.79 remaining to pay, and assume the customer will pay $6 tips, so the total amount will be $46.79. Assume the customer pay $20 in cash and pay the rest by debit card. Let’s first enter 6 in the Tips textbox. Then, enter 20 in the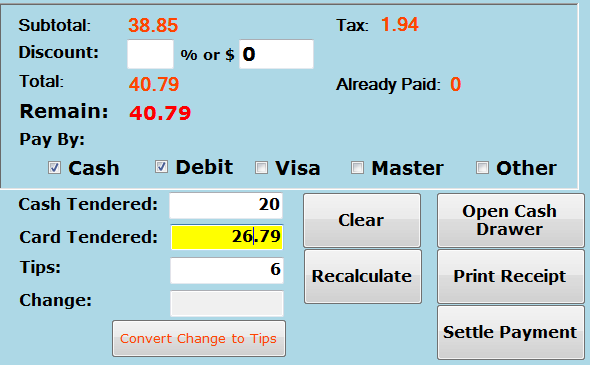
Cash Tendered textbox, next check the Debit checkbox, and the Card tendered textbox will be filled with the rest amount which is 26.79. Because the payment consists of both Cash and Debit Card, so there is no change. In the case of the incorrect data is being showed, you can hit Recalculate button to correct that. If there is change for the customer, hit Open Cash Drawer to get the change for the customer.
To print receipt, hit the Print Receipt button.
To finish the payment, click Settle Payment button. Click Exit button to come back to the previous screen.
Bill Separation
If the guests want to split the order evenly, click the Split Bill by Person button. Then enter the number of guests to split and click OK to finish. If the bill is split by items, click the Split Bill by Item button. Then, the screen below appears.
Now, select the item for the first suborder, and click the “>” button to move it to the right side, and continue until all the items in the first suborder are in the right side, next hit the Create Suborder button to create the first suborder. Repeat the same procedures above until all suborder are created.
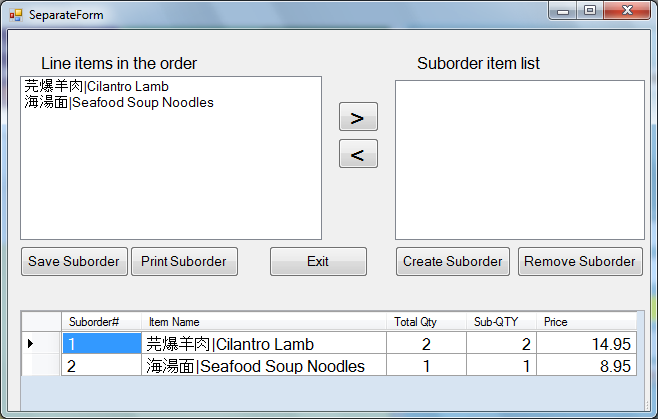
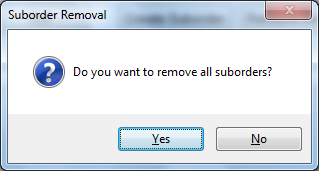
To finish this bill split, click Save Suborder button, and if you like to print the suborders, hit the Print Suborder button. To reverse the split, select the suborder one by one, and click Remove Suborder button. After no suborder exists, click Save Suborder button, and the following popup appears to confirm your action, click Yes to reverse the order back to no split status.
Order on-hold and enable on-hold orders
In a busy restaurant, you may need to put an order on-hold so that you can set up a new order in the same table. After the table is set up for the new guests, then you come back and enable the on-hold order, and settle the payment for the order.To put an order on-hold, click the table with the order to open the order. Next, click the Order “OnHold” button and confirm your action. After that, the screen is closed automatically and return to the main screen. If you click the table contains the on-hold order again, you will see there is no order in this table, and you can place a new order in this table. And you also notice that the “Enable Onhold” button is not greyed out now, that indicates there is an on-hold order in his table.
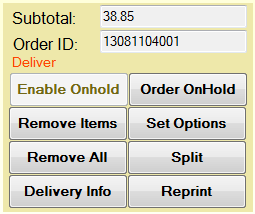
To resume the on-hold order, click the Enable Onhold button and confirm your action, now the order is being showed in the OrderForm, and you can continue processing this order.
Adjust orders
This feature only allows user to change today’s orders in the case of mistake. You can change the following data: Table No, Table Type, Cash Amount, Card Amount, Tip Amount, Order Status, Delivered By, Deliver Time/Guest Number, and Order Type, and Paid By.After changes, don’t forget to hit Save Changes button.
One typical example is to cancel orders; you can cancel an order in the Adjust Orders screen, another example is guest paid this order by Visa, but the amount is typed in the Cash Tendered.
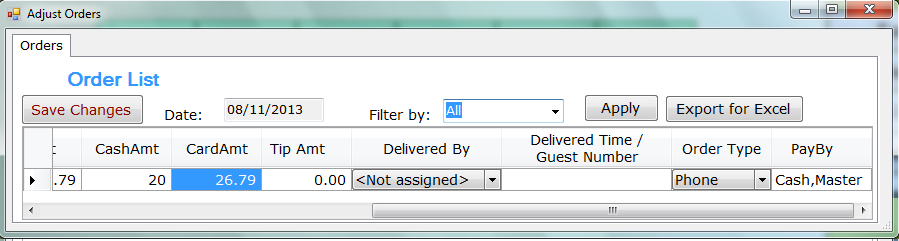
Please note there is a horizontal scroll bar to move the data back and forth. One example of using Adjust Orders is to enter tips amount after the order is settled.
Advanced Order Management
If your account has Administrators role, you have more control over orders. The advanced order management is one of the Administer feature. Click Administer button from the main table screen, you can see the first tab being is Orders tab. Change the date range, and hit Show button, the orders will be showed in the table.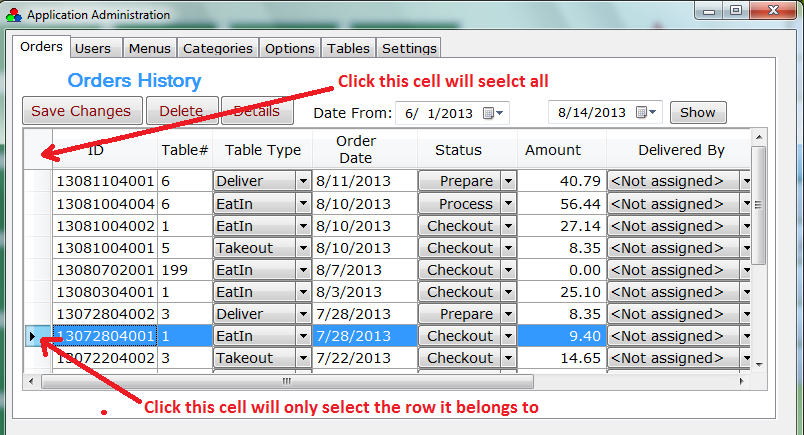
You can change the order data by clicking the cells and type in the value you want. To persist the changes, click Save Changes button. To delete the all orders in the table, you can click the top left cell in the table, and all rows are highlighted, then hit Delete button to do the trick. To view the details of the selected order, click Details button. The screenshot below is the details of the order.
You can change almost everything above, but you must click Save button to persist the changes.
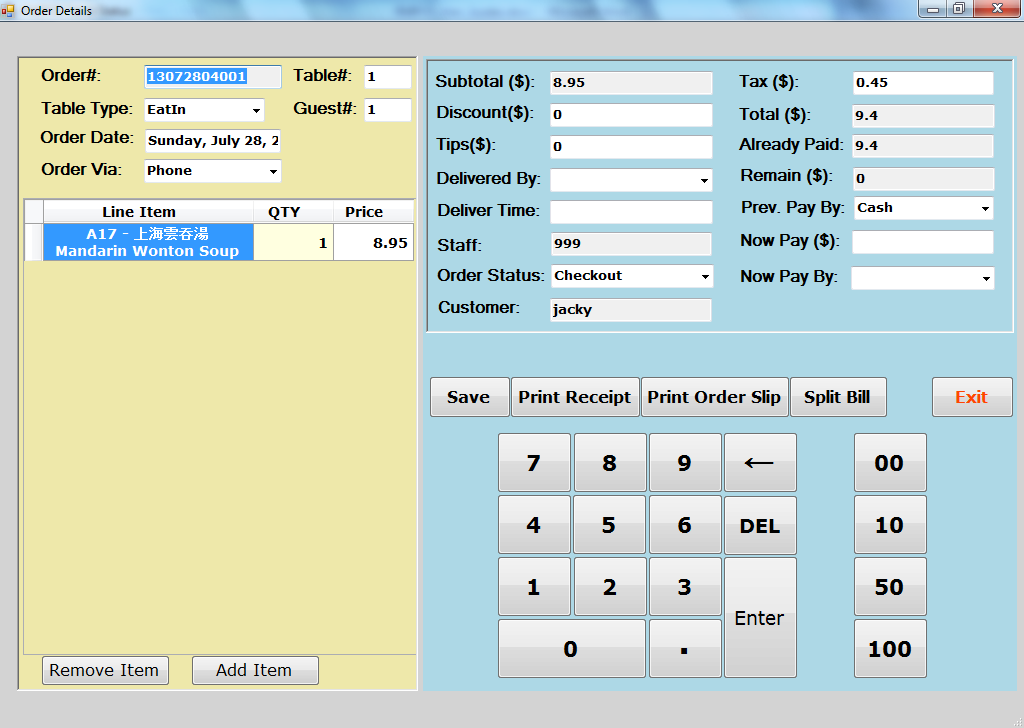
Table Reservation
From time to time, you make receive phone calls or book online to reserve their seats. You can enter customer’s reservation by hitting the Reserve button from the main screen.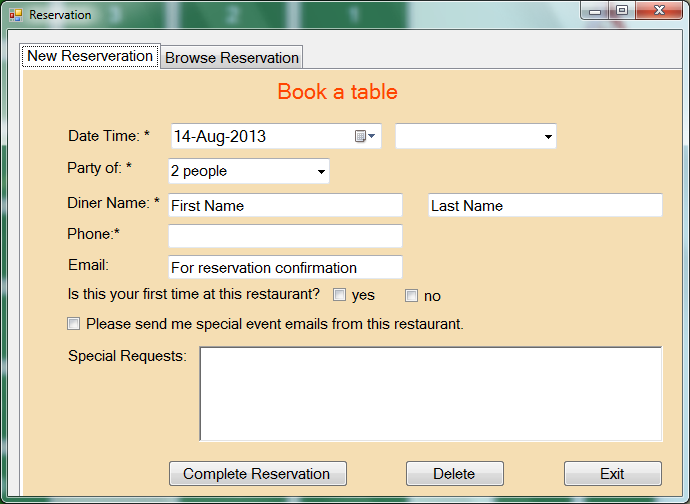
To create a new reservation, the required fields must be filled, and then hit Complete Reservation button.
To browse current reservation status, click Browse Reservation tab. The below is the screenshot.
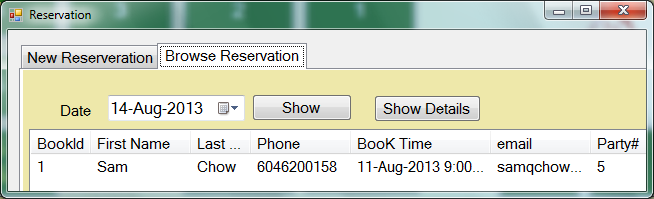
To see more details of the reservation, highlight the reservation row, then click Show Details button. In the details screen, you can update or delete the reservation.
Sales Reports
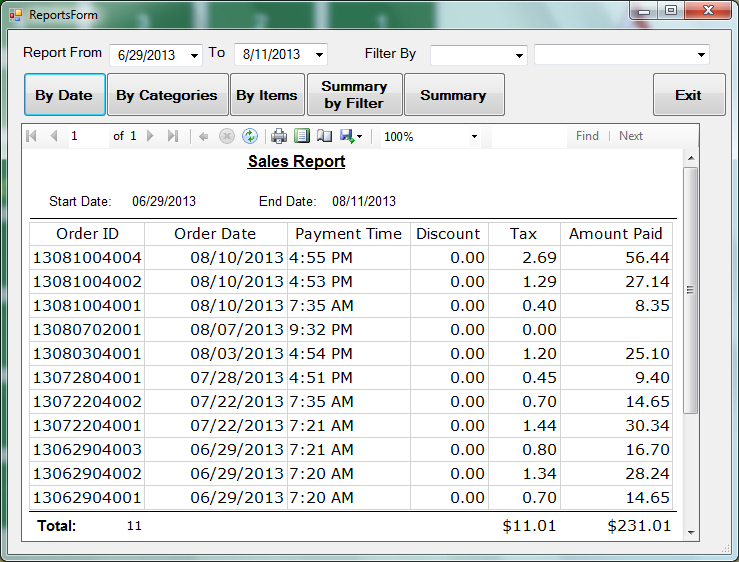
This feature requires of Administration role to access.If you have the permission to access reports, click Reports button from the main screen and the following screen should appears. Let’s say we want to check the report from 29-Jun-2013 to 11-Aug-2013 (both dates are included), change the start date to 6/29/2013, and change the end date to 8/11/2013. Next, click By Date, By Categories, By Items respectively, and you will see the report being showed in the screen. There are filters for you to show specific category or item.
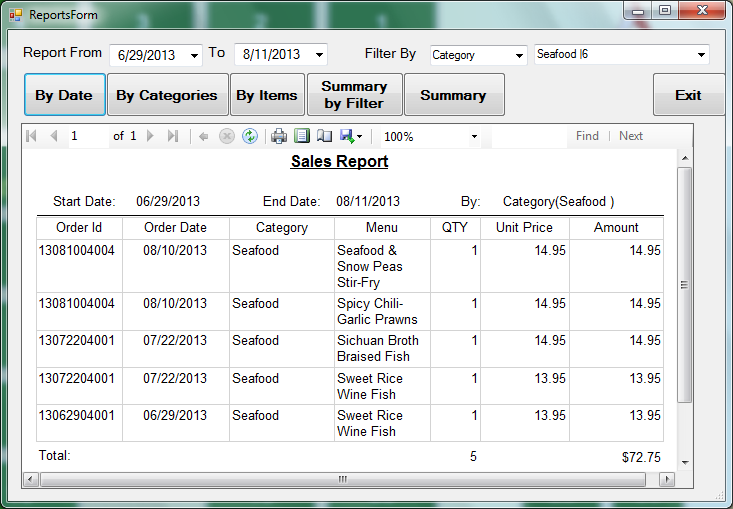
Let’s use filter to see the sale report for the category called Seafood. Select Category from Filter By dropdown field, and select Seafood from the values dropdown box, and click By Date button. The report is being showed as the screenshot below.
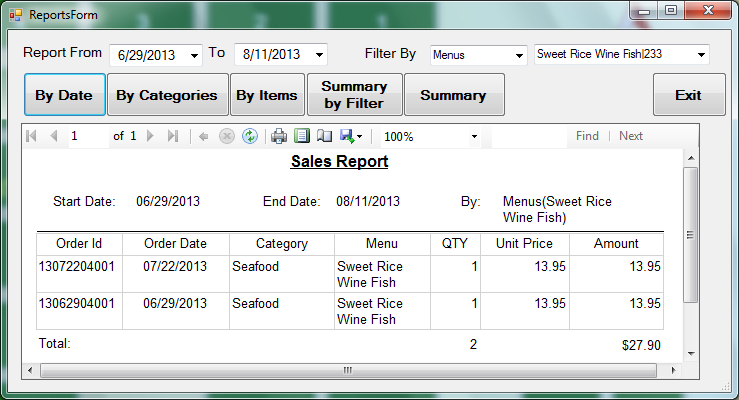
If you want to see the report for specific a menu item, select Menus from the Filter By dropdown box, then select the menu item in the value dropdown box, and select the Sweet Rice Wine Fish, and finally hit By Date button, and the report is being displayed as figure below.
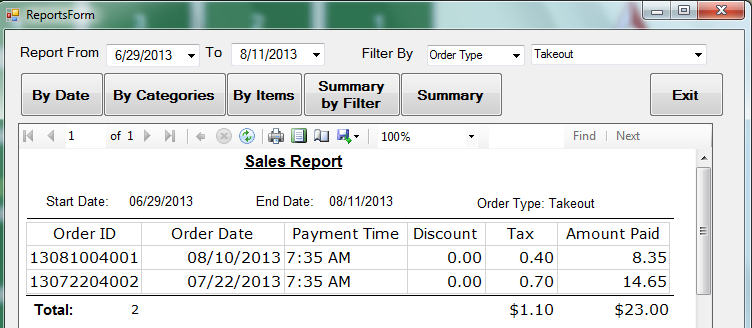
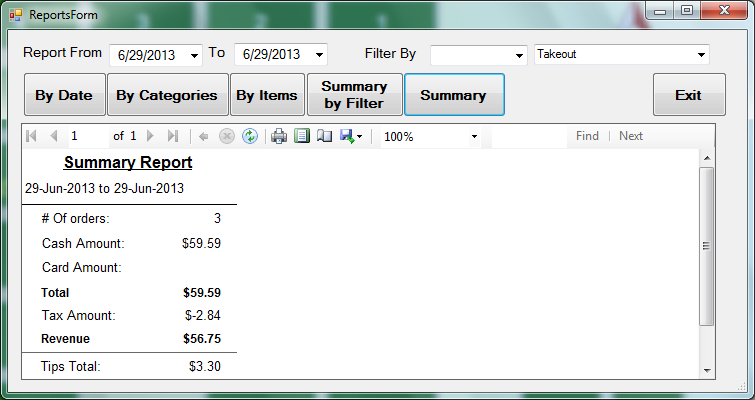
If we like to see Takeout order report, select Order Type from the Filter By dropdown list, and select Takeout from the value list, and click By Date, and we got the report below.
Daily summary report offers you a daily sales picture. To view current day’s sales, make sure the Start Date and the End Date field are the same, and hit Summary button, you should see the similar report as below.
To see the sale summary for a period of time, change the Start Date and End Date field respectively, and hit Summary button.
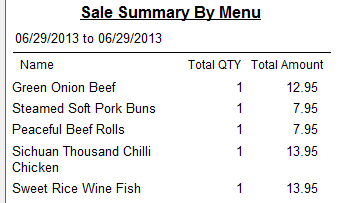
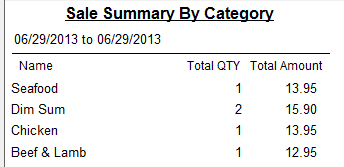
Summary by Filter is another power report tool. You can use it to get a sale report broken down by menu items or category. Below is the screenshot of the report.
Q & A
1) I accidently checkout a wrong table, and the table disappears from screen. How can I get the table back?Answer: To reverse the table, hit Adjust Orders button from the Main Screen, and look at the order in the list, and change the status from Checkout to Process, remove the number in the these fields: Cash Amount, Card Amount, Tips Amount, finally hit the Save Changes button.
2) When I settle a payment by Visa, I forget to check the Visa option, and type the amount in the Cash Tendered field, and close the payment. Now the table is completely invisible due to order settlement. How can I correct my error?
Answer: To correct payment error, go to Adjust Orders screen, find the order you want to correct, remove the value in the CashAmt column, and type the same value in the CardAmt column, and change PayBy from Cash to Visa, finally hit Save Changes button.
3) In the end of day, I print the daily summary, and Total Card Amount in the report is not the same as the number I get from the Card Payment Provider, I don’t know how to find the cause.
Answer: To find out the cause, you have to check the today’s transactions one by one. You’re better export all orders occurred in the current date to an Excel file, then open the file in the Excel, and check the orders with your card payment transactions one by one. To Export current date’s orders to an Excel file, open Adjust Orders, and select Card from the Filter By dropdown list, then click Apply button, and all card transactions are listed below, finally hit the Export to Excel button to save in a file under My Documents folder.
4) What are the default users created by RMPOS initial installation?
Answer: Two users are created and both have the administrator role: the first is rmpos, and its password is Rmpos123$; the second is 999, and its password is 999. You can use any of two users to login to the RMPOS.
5) How can I cancel an item in an order in the case customers don’t like the item they order?
Answer: Just change the quantity of the item to 0 if the original quantity is 1, and click submit button to print the change to kitchen. Of course, if the original quantity of the item is 3, you should enter 2 in the quantity field if the customer only cancels one.